Island Cottage

Island Cottage
"Isola" -island cottage in Maine

Thursday, September 8, 2011

It's a Dinosaur Paleontologist Birthday Party!

Here was the initial inspiration for a Dinosaur / Paleontologist Birthday Party-- a "large floor size dinosaur puzzle"!  And from there, well, one thing led to another and it became an all out "DINOSAUR PALEONTOLOGIST REAL LIFE ADVENTURE PARTY!" 


ALL "PARTY GUESTS" WERE GREETED WITH THEIR VERY OWN SCIENTIST WARDROBE UPON ARRIVAL TO THE PARTY. WE HELD OURS AT A LOCAL PARK WITH WALKING PATHS.

"WHITE LAB COATS" GAVE EACH CHILD A TRUE SCIENTIST LOOK (We purchased a variety of children's white button down shirts for less than a dollar each at Goodwill and laundered at home) but white tee-shirts cut down the front would work as well.

"SCIENTIST GLASSES" CONFIRMED THAT PALEONTOLOGISTS WERE SERIOUS ABOUT THIS DINOSAUR PARTY! (We Purchased -1.25 magnifying reading glasses at the Dollar Store and popped the lenses out of each pair to give to guests as they arrived) So fun!

AND THE "WARDROBE" WAS COMPLETED WITH A "DINOSAUR LAB" SIGN FOR AROUND THEIR NECK WITH THEIR PERSONALIZED NAME ON THE BACK (We made these free hand out of green card stock. We cut a large leaf from the card stock and added a few leaf detail markings with black permanent marker and wrote " DINOSAUR LAB" on one side and the child's name on the back side, and then laminated it. We then punched two holes in top part of leaf to add a a piece of raffia or grosgrain ribbon to so it could be worn around the neck. You could easily pin it to the lab coats as well instead or simply write "Dinosaur Lab" on the back of each shirt, and the child's name on the upper left front of the shirt in black permanent marker to given the appearance of an "official" lab coat if you're short on time.


These dinosaur "paleontologist" oufits made for great photo ops at the party and the kids look adorable and ready for their dinosaur excavations!


Posted by Picasa

Tuesday, July 26, 2011

Coastal Pink Polka Dot Tablescape


Easy and quick, this simple pink polka dot theme tablescape has a fun coastal twist and uses everyday items you have might have on hand....Strawberry flavored pink milk is a great hit for any gathering (especially for kids) and makes for a great presentation when mixed in a mason jar and topped with a brown coffee filter topper. Pink polka dotted ribbon is added to the mason jar for a final touch.
Posted by Picasa

Simple additions to chocolate and pink polka dot tablescape!


We used all white platters (this large white serving dish is from Pampered Chef Simple Additions collection) for a clean visual display for all of our menu items. Our first layer for this tablescape was inexpensive chocolate and pink polka dot wrapping paper (We found ours at the Dollar Store) and carried over this theme for the remainder of our tablescaping. We love coffee filters and this display was not lacking for them. Our choice was the natural colored brown hued coffee filters (but white would work well too), and we used them to serve as individual serving holders for our mini pudding graham cracker pie desserts garnished with pink polka dot sprinkles and white gum balls on toothpicks. A pink polka dot ribbon was wrapped around the serving dish to add a touch of whimsy and makes it all the more special for your guests!
Posted by Picasa

Easy Chocolate, Pink, and Polka Dot Tablescape


This tablescape was inspired by pink polka dot ribbon and a pink painted conch shell that leads you to a simple easy pink polka dotted celebration. Most of these items can be found in your pantry and if not, are readily available. The pink tissue paper flower balls are simple and easy to make and add a fun instant party atmosphere. We made then using 8 sheets of pink tissue paper, a twist tie, and brown string to hang them. We accordian folded the 8 sheets of tissue paper, and then used a twist tie to secure the center. Next, we used scissors to round the ends into flower petal shapes, and tied the brown string to the center. Then we simply and carefully pulled the layers of tissue paper away from each other, shaping both sides into a hanging flower ball. Hang from the ceiling and Whala! The more the merrier! Instant party happiness!
Posted by Picasa

Chocolate Mousse and Bubble Gum Toppers


In keeping with the chocolate and pink polka dot themed tablescape, we indulged in chocolate mousse dessert (made from a box) with fun mini cupcake and pink bubble gum toppers. Super easy, and super fun for everyone! Just take a toothpick and carefully poke a hole through the center of a mini white cupcake holder and then top off (carefully without letting the bubblegum slip) with a round piece of pink bubble gum. Whala! We displayed the dessert in champagne glasses adorned with a piece of white grosgrain ribbon simply tied at base of the stem on the glass. To finish the presentation, we used a large square plate (ours was from Pampered Chef Simple Additions collection) and layered a pink square paper plate on top to set the chocolate mousse desserts on! Fun, yum, and oh so delightful for your guests!
Posted by Picasa

Chocolate milk and polka dot fun!


Easy, simple presentations add some charm to a favorite stand by chocolate milk drink. It carries over the browns and pinks of this spunky tablescape. Pink polka dot ribbon is wrapped around "Yahoo" chocolate flavored drink bottles after their wrappers have been removed and then topped off with mini cupcake toppers for a fun drink display. Set them on a large square white plate platter lined with a pink square paper plate and you are ready for show! We chilled ours in the fridge before guests arrived but you could easily keep them chilled throughout the party in any ice bucket display as well and wrap the ribbon with clear packing tape to make it a bit more water proof if desired.
Posted by Picasa

Tuesday, April 5, 2011

Quick Simple Mirror Update

We have a standard large mirror over our vanity, and wanted to add more dimension and updated style--- so for a quick easy update, we simply hung a decorative mirror  (I purchased mine at K-Mart) with ribbon on top of the existing mirror (hung by a decorative nail in center of wall just above existing mirror)-- it adds instant pizazz, great dimension, and updated the bathroom quickly with a more modern touch.  Try it!

Monday, February 28, 2011

Personalized Chalkboard Painted Candle/ Flower Holders

 A quick weekend project was inspired by our beautiful bourgonvillea plant in our backyard.  Being a New England girl where you have to be Very Very Very patient for Spring to arrive, here in Florida, I get to delight in some of the earlier joys of fresh flowers in your backyard.  Our bourgonvillea is happily growing and sprawling and to keep it in control, my hubby presented me with a bountiful amount of them for our table. Hence, I had good reason to complete this project idea. It's one of those fast projects you can easily create with 3 easy items---
  1. square candle holders ( I purchased 5 of them at the Dollar Store) and love these for almost anything (tealights, flowers, candy containers,etc.)
  2. chalkboard spray paint 
  3. white chalk if you want to personalize them (plus flowers of your choice or tealights to complete)

Start with a Clear Square Candle Holder....as many as you want (I did one per family member)....

Use Chalkboard Spray Paint and spray glass candle holders in well-ventilated space (I turned mine upside down and only spray painted the outsides of the candle holders).  I put a small board on a turn-table so I could easily spin them as I painted.  This helps to get to all sides but not necessary.

Here's all five of them with bougainvillea flowers in them from our backyard.....

I personalized them with initials for each family member.....using white chalk........(these would be fun at each place setting at the dinner table also...with flowers or tealights...)


and happiness is...... spreading the joy......... 
Have you treated yourself to some flowers lately? Posted by Picasa

Wednesday, February 16, 2011

Go for a stroll with Me along the Coast of Florida

 I discovered a new favorite walk/run route that now begs for me to make the time to exercise! Not always successful, however, this route does inspire me to love where we live, and to hit my feet to the pavement more often. Here are some of the sights I get to take in and they all make me stop and "smell the roses".... what is it about the coast that can stop you in your tracks!!!!!! Enjoy!

 
The start of my walk/jog "wog".........


The SeaShell Statue that tells me "I am almost there......."


 At last................here was the view....
Worth the wait & the exercise.............to arrive here!
 
Gems of the Suncoast............
The sights........... 
   
The sounds..............
The coastal seagrass.................

I can't wait to come back.............Where will your route take you today?...........


Tuesday, February 8, 2011

Craft Drawer Gets Organized!


I woke up Saturday morning with the feeling that I wanted to accomplish "something" on my "to do" list but not thinking I necessarily was up for one of the "Big projects".  So I figured I'd tackle something that would benefit all of us as a family and leave me with an "almost" instant sense of gratification and accomplishment. Hence, the CRAFT DRAWER got DECLUTTERED and "RE-SCAPED". 
                                                               CRAFT DRAWER "BEFORE"
 
Drawer gets emptied...... "Where's all our stuff Mommy?"

Here's a quick overview of the how to:
First, I emptied the drawer of all its belongings and cleaned the drawer and purged anything unnecessary (ie. dried up old markers, pencils without erasers, old glue, etc.).
Next, I sorted everything into categories (ie. markers, paint, crayons, glue, playdough, etc.)
Then I placed everything into the same clear containers ( I used "AS SEEN ON TV" interchangeable square clear containers that had a few different sizes to them, but all can use the same lids)-- I found mine on clearance at a local "Dollar General".  I love them as they are all clear and contents are visible.  This is especially helpful with "little ones" in the house who are not yet reading but able to help with "clean up" a little. The clear containers make it easier for everyone to find what they want quickly and return it to its "rightful" home or at least that's the idea, right?

Then the fun part, ........ I placed everything in their new containers back into the drawer and WHA LA! Happiness is......... a cleaned, organized, decluttered and rescaped CRAFT DRAWER! Love that!

CRAFT DRAWER "AFTER"!.....Even a smile from the creative artist in the family!
Then the fun part, ........ I placed everything back into the drawer and WHA LA! Happiness is......... a cleaned, organized,and decluttered and rescaped CRAFT DRAWER! Love that! I was even inspired to tackle one more drawer, and did our "Junk drawer" that is a never ending "catch all" for clutter. Here's the result!


This time, I used a 2 layer organizing tray and again, placed like items with like items and found new homes for anything that didn't relate to the function of the drawer.

Have you cleaned out a junk drawer lately? 
Posted by Picasa

Friday, February 4, 2011

Easy Simple Elegant Valentine Dessert that Complements Coastal Valentine Tablescape 2011


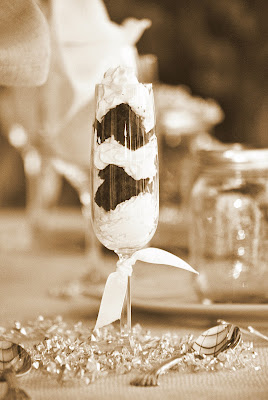
Coastal Valentine Tablescape Dessert Idea February 2011

photo by karen m. comeau @ www.thebanyantreecoastalfurnishingcompany.com
This dessert is a great complement to the Coastal Valentine Tablescape 2011 posted on February 3, 2011.  Easy, simple and delicious.  Here's the "How to Create" simple quick version:

Mix chocolate flavored cupcake mix (or flavor of your choice) and bake as cupcakes or cake.  When finished baking, allow to cool and then cut cupcakes or cake into small bite size pieces.  Set aside.  Mix together a whoopie pie frosting  (I used Better Homes and Gardens Cookbook "Celebrating the Promise" "Creamy Frosting" recipe as the start, but substituted the butter for shortening to make a lighter tasting frosting), (or any canned frosting if short on time) and then layer cake pieces in champagne flute with frosting (alternating to the top of glass). Last layer should be the frosting layer and adorn the frosting with a "sweetheart valentine heart shaped candy" with a message on it.  Tie a white grosgrain ribbon around the champagne flute for an extra touch.

 Serve and enjoy from karen @ www.simplescapes.blogs.com and www.thebanyantreecoastalfurnishingcompany.com
jelly jar presentation for Valentine Day dessert
Alternate idea: substitute champagne flute for either a wine glass or mason or jelly jar (for a more casual look) and layer the cake and frosting same way as written above.  Serve and enjoy from karen @ www.simplescapes.blogs.com and www.thebanyantreecoastalfurnishingcompany.com

Thursday, February 3, 2011

Coastal Valentine Tablescape 2011

Coastal Valentine Tablescape 2011
by
Maine,coastal, cottage, beach, and shells have always invoked a sense of home to me, hence this coastal Valentine tablescape for you..... here's the "how to create the look" recipe below...
Recipe for Coastal Valentine Tablescape 2011

Ingredients:
·        White tablecloth (fit to your size table)
·        Piece of off white burlap from fabric store (I purchased mine at Walmart 2-1/2 yards) and overlayed it on the diagonal for added texture to the table
·        2 Krafty Bloks (I purchased mine from Michael’s craft store)
·        Medium size oval mirror for centerpiece (I purchased mine from K-Mart)
·        Rose-covered pillow (off-white roses or color of your choice) (I was lucky enough to stumble across mine at a local thrift store) but could be duplicated with satin pillow, store bought faux roses, and hot glue
·        Large starfish
·        7 strings of “Trim-a-tree”clear garland
·        White square plates (one for each place setting)
·        Silverware for each place setting
·        Mason jars (one for each place setting) I purchased mine at a local “Ace Hardware” store
·        Wine glasses (one for each place setting)
·        Table napkins (one for each place setting) (I purchased mine at a local thrift store in white and taupe linen for 50 cents each and laundered at home)
·        White “soap” roses (I found mine at the local “Dollar-Store”
·        Champagne flutes (one for each place setting)
·        Grosgrain ribbon (to tie onto champagne flutes)
·        Baking shells (I purchased from a local flea market selling shells)
·        Valentine heart sweetheart candies (I used all white one)
·        Cupcake mix and whoopie pie frosting ( I used a Betty Crocker box mix, and Better Homes and Gardens Cook Book Celebrating the Promise Limited Edition“creamy frosting” recipe (page 167) but substituted butter for shortening to give it a lighter whoopie pie frosting texture)
How to:
Layer 1- place white tablecloth on table and layer burlap on diagonal on top of white tablecloth for depth and texture
Layer 2- Centerpiece- Place 2 “Krafty Bloks” on their sides to create a base for oval mirror; place mirror on top of “Krafty Bloks”, then rose-covered pillow in center of mirror, then starfish laid gently on top of pillow, then adorned with string of clear holiday garland casually on top of starfish and pillow
Layer 3- Set each table setting with white square plate on diagonal and silverware; Place mason jar for dessert in center of each plate with a baking shell standing upright leaning against the mason jar.  Place 3 sweetheart valentine candies in front of each mason jar.
Layer 4- Place wine glass and champagne flute at each place setting. Accordion fold each napkin and place into wine glass to fan out like a “shell” to carryover the coastal theme.  Adorn each napkin with a simple white “soap” rose.  Tie a small piece of white grosgrain ribbon to each champagne flute. 
Layer 5- Hang a string of clear garland from each table setting  from ceiling or chandelier to hang down at the top of each place setting for added drama and oohs and aahhhs from your guests. 
Dessert- Cupcake mix from scratch or box—Whoopie pie frosting—Layer cut up pieces of cake into mason jar with piped in whoopie pie frosting and garnish with a white sweetheart candy on the top.  Alternative presentation- try serving this easy simple dessert in champagne flutes or wine glasses instead of mason jars for a more elegant look.  Serve and Enjoy from  http://www.simplescapes.blogs.com/


Details of Starfish Centerpiece on Rose Covered Pillow Adorned with Shimmer Garland

Starfish Wall Art and Fish Table in Background can be found at www.thebanyantreecoastalfurnishingcompany.com
 
Next posting will give recipe for simple easy chocolate dessert to accompany this coastal valentine tablescape... stay posted....